

Getting Started
Welcome to the Tersus MVP S1 Support Center. Here you’ll find everything needed to get up and running with the MVP S1 including getting started information, software, guides and more.
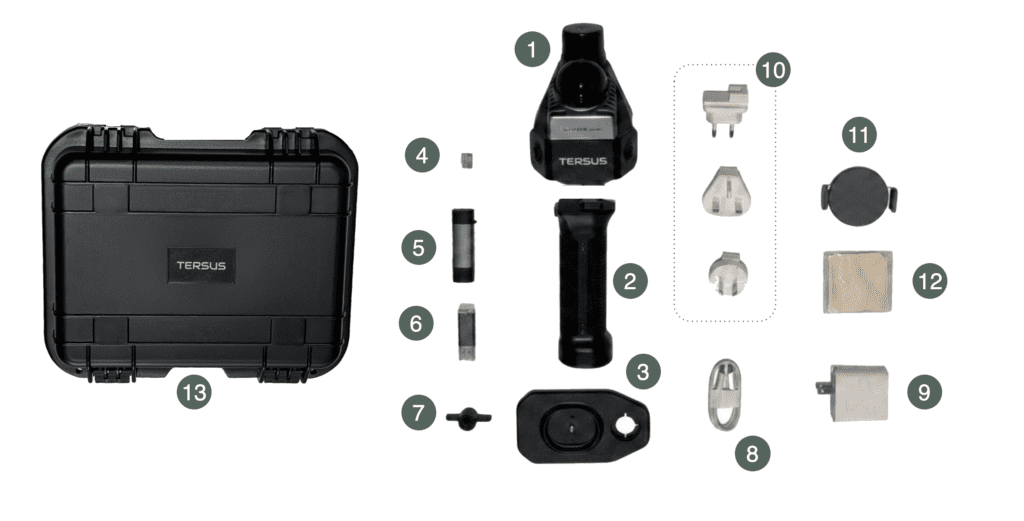
What’s Included
- Tersus MVP S1 LiDAR SLAM Unit
- Battery Grip Handle
- GCP Base
- 256 GB Micro SD Card
- SD Card Adapter – USB/USB-C
- MVP Mapper Software Dongle (Software Key)
- 1/4-20 to 5/8 threaded adapter
8. USB-C Cable
9. AC Power Adapter
10. International Charging Adapters
11. Magnetic Phone Holder
12. Cleaning Cloth
13. Hard Cary Transport Case
Unboxing and Setting Up Your Hardware
This quick video walks you through the key hardware components of the Tersus MVP S1, including powering on and charging the device.
Installing the MVP Capture Software
The MVP Capture software supports both Android and iOS devices.
- iOS – this can be downloaded from the Apple App Store.
- Android – the installation APK is included on the Micro SD card provided with the Tersus MVP S1. The APK can be installed directly from the Micro SD card, transferred to your Android device using the included SD card adapter, or copied to your device through a computer.
Connecting to your Device
Connection to the device is completed via Wi-Fi. The MVP S1 will appear in your available wireless networks using the device name and serial number as the SSID.
To connect, select the device network and enter the default password: 123456789.
iOS Users: One Extra Step Before You Continue (Android users, you’re good to skip ahead)
How to Configure iOS Network (Manual IP Setup)
Open the MVP S1 Wi-Fi settings on your iOS device and find the IPv4 configuration options.
Set the IP configuration from Automatic to Manual, then enter the following details:
- IP Address: 10.42.0.100
- Subnet Mask: 255.255.255.0
Save the settings once complete.
This setup is required to ensure your iOS device maintains proper network access while connected to the scanner. Without this configuration, you may internet issues when trying to connect via NTRIP.
Please note: this step is only required on iOS devices due to system limitations. Android devices do not require any manual IP configuration.
Using the MVP S1 Capture App
The MVP S1 Capture software is designed to be simple and intuitive, allowing you to easily control data collection while visualizing captured data in real time. This enables immediate verification of coverage and data quality directly in the field.
Install the MVP Mapper Software
The MVP Mapper software is preinstalled on the included MicroSD card.
- Insert the MicroSD card into the supplied SD card reader and connect it to your Windows PC.
- Copy and transfer installation files from the MicroSD card to your PC.
- Right-click the installer file and select Run as Administrator to begin the installation.
- Follow the on-screen prompts to complete the installation process.
Software Licensing & Usage
After installation, the MVP Mapper software can be used in two modes:
- Processing Mode – Requires the included USB dongle (license key) to process captured data.
- Viewer Mode – Allows users to open, review, and visualize project data without a license key.The software may be installed and shared with additional users for viewing and visualization purposes. Only processing functionality requires the USB dongle license key.